Assignment:
- Create a 30-60 second summary video to introduce main ideas about yourself to the teacher and/or classmates.
- Your final project must include at least one of each of the following media types: still image, video clip, still title slide, crawling title slide, credit roll, video transition, video effect, royalty-free music file, voiceover file.
- An exported video is due no later than end of class on Wednesday, March 21, 2018.
- Punch List - this indicates that you followed instructions and met the deadline.
- If you were unable to finish the project, indicate what you still need to do on your punch list and estimate how much more time you need.
Objectives:
- Demonstrate basic media management skills including: creating folders, transferring files between digital locations, organizing files intuitively.
- Demonstrate a basic understanding of non-linear editing techniques.
- Select and deliver content that is appropriate for the target audience and message.
Procedures:
Conceptualize and Collect - Pre-production 101
-
TO BEGIN, think about what you want others to know about you as a member of the group. Since this class will be producing broadcast messages, you will want to demonstrate relevant activities you are interested and/or involved in, as well as including quirky things that add depth to your personality as a collaborator.
- For example, everyone knows Ms. Shultz teaches English and Electronic Media, but do they know about her other interests? Do they know her zany sense of humor?
-
GATHER images and video clips that you want to include. You may do so using a flash drive, your email, Google Drive, or any other means by which you can eventually transfer them onto your school H: drive.
- For example, perhaps it would be a good idea for Ms. Shultz to include some pictures from her travels and that one video of her cat attacking the computer screen.
-
ORGANIZE YOUR MEDIA
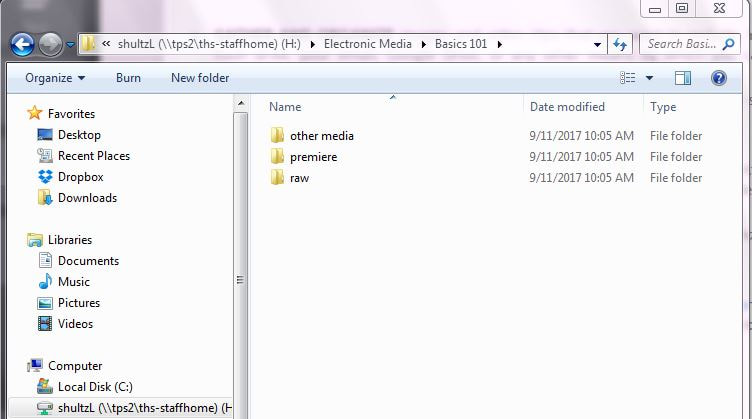
- Gather EVERYTHING you want to use for this project onto your H: drive. You have already made an Electronic Media folder for your work in this class. Now, make a folder INSIDE that folder for this project, "Basics 101."
- Make SURE you take the time to organize your media (photos, videos, music, etc.) NOW. If you try to do it LATER, your editing file will lose its "links" to the media files.
-
Here is an example of how your folder for this particular project might look - make note of the folders and locations. Do not simply follow the model in the video. Choose an organization system that makes sense for you, for this class, and for this project (the first of many!)
- other media: your pictures, music, videos - basically everything you already have that you think you might use
- premiere: where you will eventually set up and save your project file
- raw: footage/media that you film/create specifically for this project
-
COMPOSE a brief voiceover that you will record to accompany your video. At minimum, it must be one sentence that relates in some way to your content. You may include more information or sound effects, if you wish.
- For example, at minimum Ms. Shultz might say/sing, "Ms. Shultz - More than meets the eye." (It's a Transformers cartoon reference.)
- SELECT at least one musical track to be your soundtrack from Incompetech: Royalty-Free Music. When you find one you like, download the file and re-save/move it to your H: drive.
Start to Edit - Basics 101
- Professionals in technical fields are responsible for ongoing self-education as technologies and practices change over time. Luckily, a significant amount of technical learning is delivered online, for free.
- Watch the following tutorial in order to get started with editing in Adobe Premiere. https://www.youtube.com/watch?v=R5K-ooay-vA
- You can easily turn on closed-captioning (text of the voiceover) by clicking the CC button at the bottom of the Youtube window.

- For your sequence settings, choose the best option for the videos you are using. If you are using cell phone videos and/or photos, select the option from Mobile & Devices that most closely resembles how that media was created. You may need to do a quick Google search to identify the best settings to use. Taking the time to select the correct sequence setting now will save you time later, and will also ensure that your completed project stays at the best quality and resolution possible.
- DO NOT CONTINUE UNTIL YOU HAVE COMPLETED WATCHING THE VIDEO AND ARE SURE YOU ARE ORGANIZED.
- If you finish these steps today, move onto the next tutorial, Tools Overview in Premiere Pro CS 5.5 "Full Tutorial" at https://www.youtube.com/watch?v=Jag7bpPMGLU .
Revisions 101
- As you continue to add of the required elements, review the "message" you want your peers to get. Videos will be available for viewing by your classmates, but they will not be screened in front of the group. This video is a way to share something about yourself with the group.
- Adjust the pacing of your video - it needs to be 30-60 seconds, but does it "feel" energetic, or is it a chore to watch? Consider cutting your video and photos in time with music.
- Adjust audio levels - can your voiceover be heard clearly? Is your music at an appropriate volume? Did you fade your music tracks in/out to make the video more enjoyable for a viewer?
- Add text/titles that help explain what the viewer is seeing. At minimum, you need one still, one roll, and one crawl. Typically, a still is used as the beginning title, and a roll is used for the end credits. Feel free to experiment.
- Review and credit your use of media clips. All media must be credited in your credit roll. Make sure you have the rights to use all of the media included in your project - if you found something on the internet, you must include the attributions as stipulated by the creator.
- Model your credit roll off this document, Credit Roll 101. You can easily copy the text from the Google Document and paste it into your credit roll. Then, make your revisions and formatting choices.
- Preview your project to a test audience. For now, ask a friend to watch through your video, start to finish, and give you their impressions. What are their suggestions? What are their points of praise? Gauge the success of the current project based on the reactions of your test audience (peer critique).
- Check project requirements. Go through the punch list provided by your instructor. Add the critiques given to you by your test audience and any action items that resulted from that discussion. Continue to revise your project as you address the items in the punch list.
- Check your pride. Only be complacent with things you cannot address by the deadline given, and don't give up easily. For example: while lower-resolution images are not desirable, they do not significantly interfere with a viewer's experience. Focus on things you CAN address, such as the overall effect your project has a viewer who may not know you yet. Don't simply do it to get it done - have fun with it! You want your first editing project to be something you are proud of, but you also want it to make the kind of impression you intend it to.
Distribution 101
|
I made this giphy using an Instagram video from animator David Firth, captioned:
"When After Effects can't find the source files...." See? It even happens to professionals. We're using Premiere right now, but the concept is the same. Your project exists on your H: drive - you have linked all of your media files to your Premiere project file. In order to submit your project properly, you must proceed through the following steps. |
Follow the steps below to complete the task so you can submit a video file viewable on any computer.
1. Open your file in Adobe Premiere
- Review your punch list to make sure you have included all of the assigned elements.
- Make sure to re-save your project before attempting the next steps.
2. Configure Export Preferences
- Select File -> Export
- Select Export -> Media
- In the dialog box, do the following, in order:
|
|
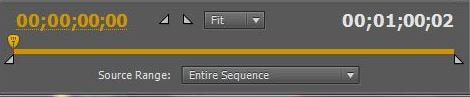
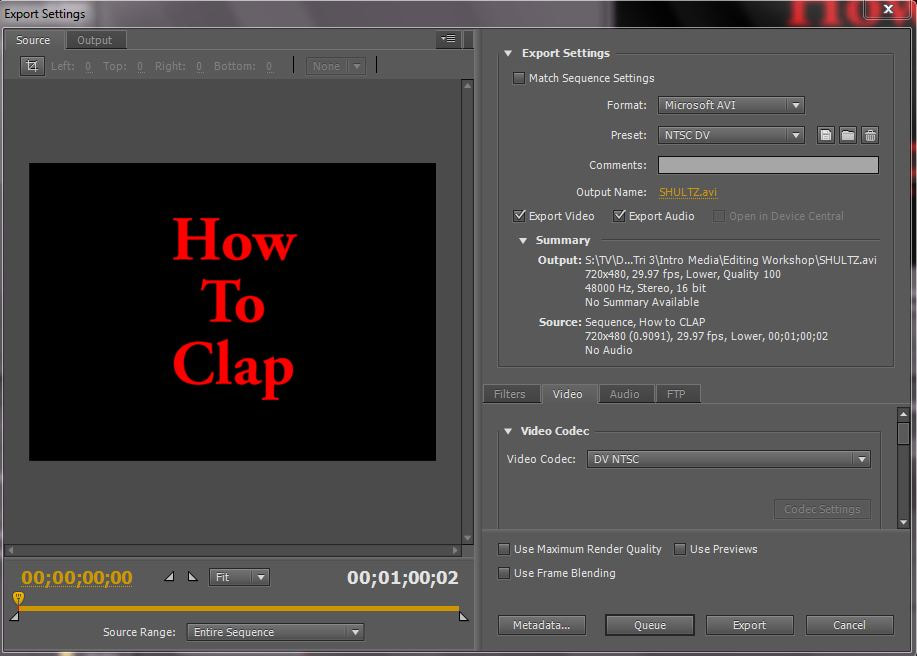
--> in the bottom left corner, change Source Range: to Entire Sequence
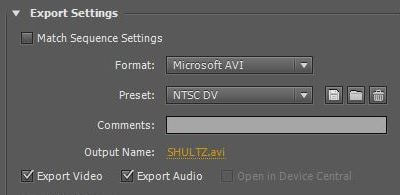
--> under Export Settings, change the Format: to Microsoft AVI
--> next to Output Name: click on the orange file name
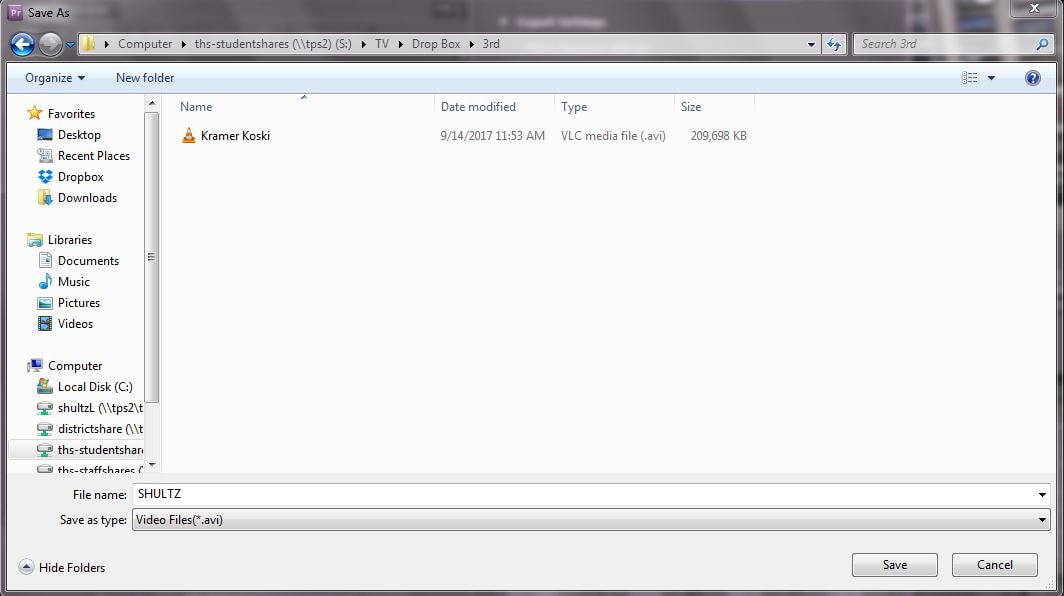
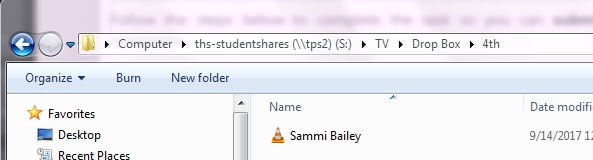
--> Navigate to your class dropbox on the Student Share (TV -> Dropbox -> Hour)
--> Name your file with your full name
--> Click Save
--> under Export Settings, change the Format: to Microsoft AVI
--> next to Output Name: click on the orange file name
--> Navigate to your class dropbox on the Student Share (TV -> Dropbox -> Hour)
--> Name your file with your full name
--> Click Save
3. Create an Exported Video
- Re-check your settings
- Click Export
- Your file will take a few minutes to export, and then appear in the dropbox you selected.
4. View your file in the TV Dropbox to make sure it exported correctly.
5. Turn in your punch list to Ms. Shultz - this indicates that you followed instructions and met the deadline. If you were unable to finish the project, indicate what you still need to do on your punch list and estimate how much more time you need.
 RSS Feed
